techniques

All posts tagged techniques

There is a lot to be said for how far technology has allowed us to go in the world of ropes as it relates to safety: Stronger yet smaller ropes, lightweight high strength aluminum hardware, etc… But is fun to cast our thoughts back to where the rope rescue world has ascended (that’s a pun) from. Check out the rescue drama in the youtube video below. It is from 1949 and was posted by Ron Holan on the Rope Access Technicians Network group on Facebook.

The neat part about this for me was that they didn’t use any carbiners or friction devices to lower the casualty. It was all done with friction wraps around their bodies and around rock outcrops. While this might not be how a rescue should be done now, given all of our available equipment, it is none the less a look at how a rescue can be done without any equipment.

Maybe you could use this video as an idea for a drill: Only use a Stokes basket and a rope, no hardware, to accomplish lowering a package down a building, catwalk, mountain, etc… Oh, and they weren’t using Prusiks either. They only had trust in each other!


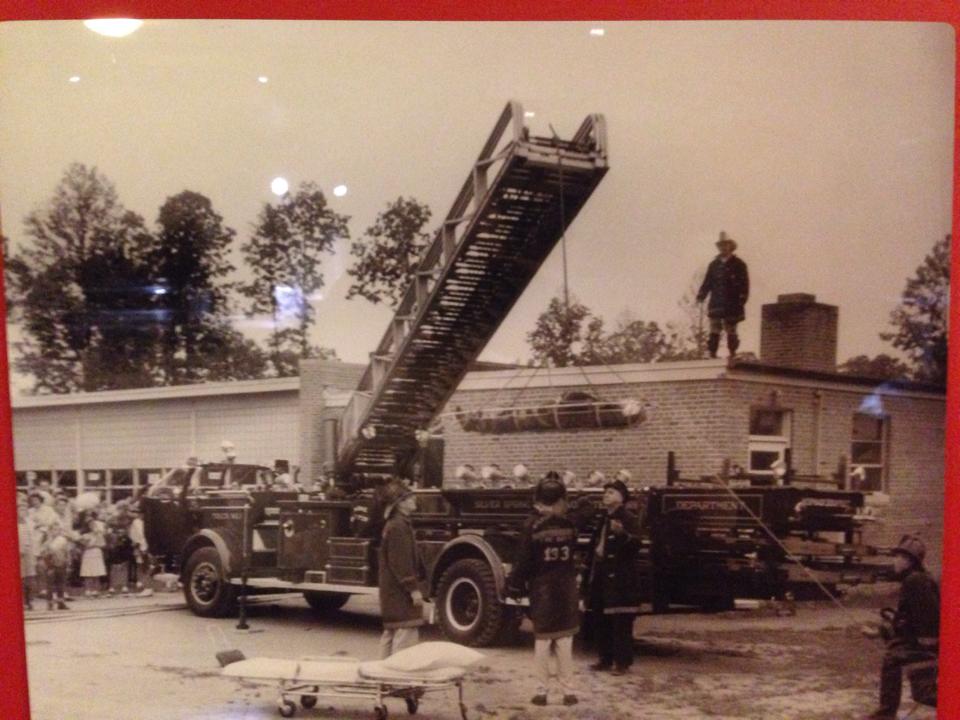
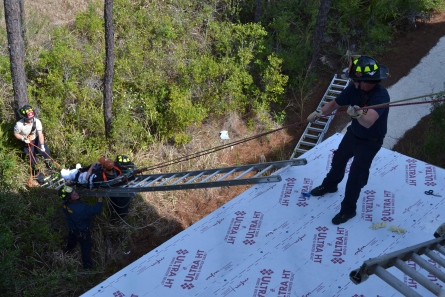
Also pretty darn old school is this picture of Silver Spring VFD using the ladder truck for a high directional to get a Stokes basket off of the roof of a one story school and down to the ground. Thanks to our Florida friend Joe Schulman for findiong and sharing this one.


It’s hard to tell for sure from the picture, but it looks like the rope is just hard tied to the tip and the ladder is just craning the load.  Similar to one of our previous posts HERE , it’s also another example of how it might be easy to access a patient via ladder and use a rope system to get them down.

old school rope rescue

We have just added an Open Enrollment Class for our Modern Technologies in Rope Rescue workshop on May 17 and 18 in Lancaster, PA.This class covers a lot of ground in two days. We will discuss and use the AZTEK in many of its essential uses. We’ll also be using the Two Tension Rope System concept with the CMC MPD. Additionally, we’ll be using the Arizona Vortex in some of its traditional configurations as well as the Rescue 2 Training original: the “Appalachian Doortex” configuration for urban anchoring and elevator rescue.

Come out and try the newest equipment and techniques in rope rescue. Cost of the class is $295.

Email Kelly M Byrne at kelly@rescue2training.com or call 240-462-6610 for more information.

open enrollment lancaster may 2014.001ufo 2ufo 1
mpd 1

The recent rescue by the South Walton Fire District’s Technical Rescue team in Florida is a great example of rescue where it is easy to access the victim by something as simple as a ladder, but where a rope based system might still be the best alternative for getting them down to the ground safely.

You can see in the pictures that the guys on the ground are able to guide the basket most of the way to the ground while it is supported on  the ladder and being lowered with rope.

Two quick points: If possible, I would have tried to line up my ladder with my anchors so that it was all in plumb. Maybe there is a good reason they didn’t. It’s hard to tell from just a picture.  Secondly, you can see how easily they overcame this by just having a rescuer on the roof do a very minor deflection by just pulling on the rope. It’s a good example of knowing how to easily overcome a problem by knowing a few physics tricks.

http://www.waltonsun.com/news/construction-worker-saved-by-swfd-1.297343#

Not all rope calls are high pucker factor incidents of life and death. Sometimes it’s just the simplest way of getting  the patient to the ground. Good job, guys.


swfd easy access

We were messing around the other day with some variations on how to better perform the best way to get a vertically oriented basket up over a 90 degree edge, which is know alternately as the “Pike and Pivot” or “V Strap” technique.

The issue of effective, efficient edge protection for our ropes and webbing was given us a bit of a challenge until our resident old man (and connoisseur of Miller Lite on his days off) , Mike S, suggested that we try and use a Sked as edge protection. It’s smooth, tough, has plenty of places to tie it off, and is much wider than standard edge protection. We’ve dubbed it Skedge Protection.

It can only be described as having worked perfectly for this situation.

I have no idea what the long term durability would be if used as edge pro all of the time, but for what we were using it for, I’ll definitely grab it without a second thought next time.

2014-03-06 11.31.20


Here is a comparison of rescues performed at different speeds. The first one is an actual rescue from down in Florida of a worker who was suspended in his fall arrest harness after the scaffolding he was on collapsed. The word from our sources who were on the scene informed us that it took 1.5 hours to perform this pickoff rescue. I was not personally there and can not speak first hand of the details, but I am told that it was a pretty straight forward scenario that just took a very long time to accomplish.


The good news is that it was successful, but had the victim been in distress, it might have been a different outcome. A pickoff should be one of the bread and butter operations of every rope team. On the scene is not the time to figure out where your attachments go to the victim, method of unweighting them from their system, etc… This should all be hammered out and drilled on well in advance.

Click here for the story and video:

http://miami.cbslocal.com/2014/02/10/scaffolding-collapse-traps-workers-in-ft-lauderdale/


The opposite end of the spectrum is this video, brought to our attention by Eric Ulner of Ropes that Rescue, of a rescue competition which includes pickoffs. These guys are FAST!!! It looks like the video is sped up, but this is just the end product of dozens of hours of disciplined practice.

While real world rescues obviously present situations you are unable to specifically PLAN for, you should always be PREPARED for what might come your way. Rescues don’t need to happen at competition speed, but that’s no excuse for taking an excessive amount of time, either.

While I’d love to start the year on a high note, this video of a rope rescue demonstration brought out the Debbie Downer in me. How many rope rescue guys does it take t screw in a light bulb? Answer: 7.  One to screw it in and 6 to point out how he could have done it better and more safely.


debbiedowner

With that in mind, I’d like to talk about the video below. There are a few things that jump out at me:

  • Firefighting gear isn’t technical rescue gear. I’d argue you are better off with the increased flexibility of your station uniform. The brim on the back of a firefighting helmet is great at keeping water and junk from falling down the back of your coat at a fire; it’s also great at hanging up on rope, railings, and everything else at a rope call.
  • While there are several examples of a worse edge transition, this one was successful, but had the potential for disaster. The mainline system was run under the fencing and the basket was placed over it. This created the potential for a pretty big drop. A belay line did not appear to be in place until the rescuer climbed over the fence.
  • There was no obvious edge protection for the main line. If the basket had dropped prior to the attachment of the belay line, it would have taken a pretty substantial fall on an unprotected edge.
  • The belay line was not along the same plane as the main line. If the belay line were to be needed, there would have been significant horizontal movement.
  • If using webbing to help lower a basket over the edge, consider wrapping a Munter (Italian) hitch around the railing rather than strong arming it.
  • A high directional would have solved most of these problems. Even just going over the fence would have helped quite a bit.  To reinforce the fence and keep it from collapsing back towards the anchor due to the resultant, a reinforcing strut could be put into place pretty quickly. Like this:

IMG_1403


There’s a right way and a wrong way to move somebody over water. Being a rope geek, I think it should always be done with rope. There might be some debate about whether it always the right answer, but I would argue that almost anything would be better than what transpired in the pictures below.

A sick passenger on a cruise liner was being transferred to a smaller boat to be taken to shore for medical treatment. She was placed on stretcher and transferred to the smaller boat while both boats were under way ! 

Things are going along just fine (but just look at the snow and ice on top of the smaller boat):

boat transfer 1

Moments later, rescuer Bob “Butterfingers” Johnson knows that he will never, ever get rid of his nickname. This is the victim taking her unintentional swim test in 27 degree water:

boat transfer 2

Read the lurid details of the incident here:

http://www.dailymail.co.uk/news/article-1378935/Sick-cruise-passenger-dropped-sea-Janet-Richardson-falls-botched-rescue.html

For another option of getting people off of a boat, check out the rope operation called a “Breeches Buoy”. It’s the older brother of the high line and was used  for getting sailors to shore off of ships that had wrecked near the shore. It is basically a high line with all controls for lowering and retrieving the victim based on the shore.

The_Life_Line_1884_Winslow_Homer

Here is a duo of rescues. Both involve rope and both involve water. They couldn’t be more dissimilar if they tried, though.

This first one is from Virginia Beach, VA where a worker on top of a water tower apparently slipped and fell and was caught by his fall protection system. He doesn’t appear to be a rope access worker; more than likely he is a brave cell tower worker who climbed over the side to do some work and slipped while climbing down or back up over the edge. That’s complete speculation on my part, but it fits the circumstances pretty well.

It looks like a pretty straight ahead pickoff with the rescuer being lowered and lifting the worker off of his system with a clearly visible AZTEK. Take a look at the victim standing in his relief step awaiting rescue. Kind of like a really small slack line attached to your harness. Not nearly as fun, I imagine. Good job by the fire department to try and do the simplest thing first: see if the ladder reaches, then set up for a rope rescue.  Thanks to Collin Moon of Elevated Safety for cluing us in on this one.

This next video was sent to us by Matt Hunt of Sterling Rope  and is now probably my favorite video on youtube! It really appeals to me for the fact that these guys are using really simple physics concepts, applied smartly, to accomplish a goal. Check out the slick use of the “pike and pivot” method as well as a two man rope winch. Not too far of a stretch from rescuing people instead of cars.

I was wondering who the brave guy was that hooked up to the car. The description says that they were able to snag a tow hook on it while standing on the ice without any problem.

If you talk about adding a tensioned belay line to your system, you’re bound to develop some tension in your conversations with people who are not yet a fan of a tensioned belay line. The most common paradigm is to have a loaded main line and an untensioned, slack belay line; this is especially true in the fire service. Recently, however, there has been a bigger push towards sharing the load on both the main and belay line.

There are a couple of reasons for this push. On the fire service side of things, the advent of a device like CMC’s MPD which is able to serve as both a lowering device as well as a competent  belay device, has made it possible for departments to capitalize on the advantages of a two tension rope system while still having a piece of gear that meets the ubiquitous NFPA standard. The second reason for the recent trending towards having a tensioned belay line stems from some extensive research into the topic. At the forefront of this charge is Mike Gibbs and his company, Rigging for Rescue.

Just what are the benefits of having a tensioned belay? As you can see from the videos below, the load falls quite a bit less on a loaded belay line. This is because the stretch that would occur in the belay line is taken out by loading the belay line prior to its activation. This is a good thing! The longer you fall, the more likely you are to get run over by the basket or hit another object on your way down. In the case of a dual MPD system, you also get the added benefit of having a mirrored system at the anchor. It’s only one device to learn how to use, which is a nice added benefit if your team doesn’t get to practice as much as you might like. Check out a pretty in depth look at tensioned belays at :

http://riggingforrescue.com/files/Download/Rigging%20for%20Rescue%20-%20Rescue%20Belays%2C%20Long%20Lowers%20-2007.pdf

The following tests were all performed by Rigging for Rescue and used a 200 kg test mass, 30m of 11mm rope in service (except for the last one, which is 10.5mm dynamic) and a tandem prusik belay. The notable differences in how far the load dropped before stopping comes from tensioning the belay behind the prusiks.

Gallagher anybody?

gallagher

Be sure to check out RfR’s website for a lot of other great research and opportunity to learn from a very knowledgeable group.

http://riggingforrescue.com/index.html